This Water Filled Slot Canyon in Zion National Park Is, Surprisingly, a Great Winter Hike
When we were planning what hikes we wanted to do in our trip to Zion National Park the first week in January, Matthew emphatically stated that we were definitely doing the Narrows. I, on the other hand, was initally not at all convinced that hanging out in icy water in the middle of winter was something I wanted to do.
Thankfully, he convinced me to go for it, and I am SO GLAD because the experience was absolutely amazing – it was our favorite hike the whole time despite the freezing cold water.
And the water was basically freezing – the day we hiked the water temp was 37 degrees Fahrenheit. Despite the cold water and the extra gear we needed, I would be as bold as to say that winter is the BEST time to hike the narrows!
Through the experience and talking to others, we picked up a lot of helpful tips for hiking the Narrows in the dead of winter. These are our best tips!

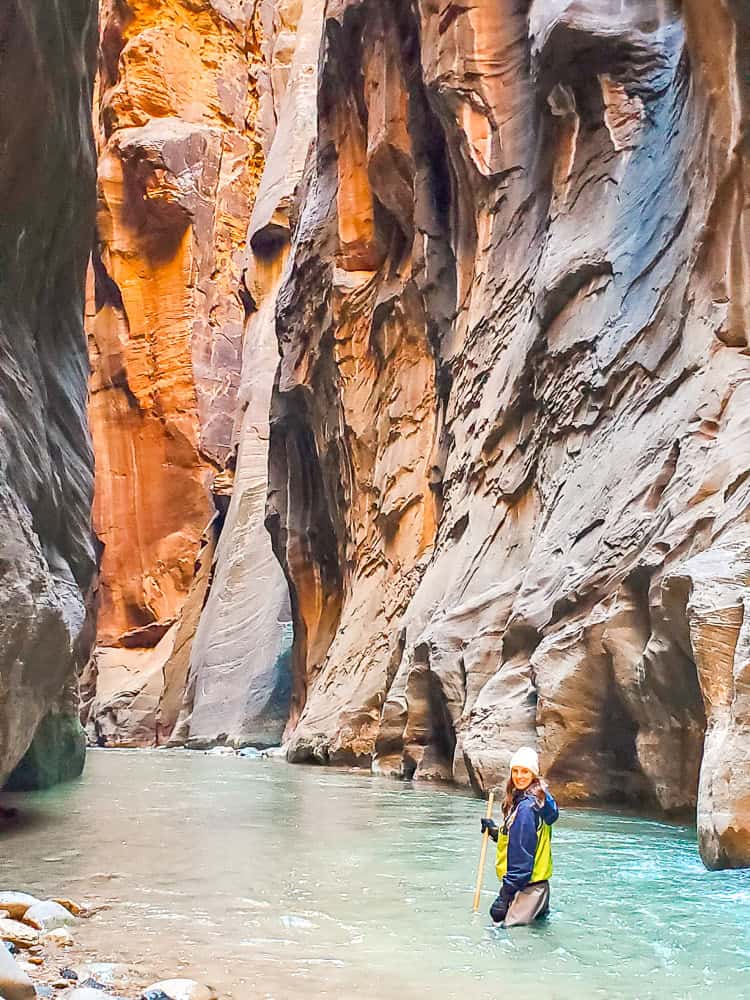
If You’re Hiking the Narrows in Winter, You MUST Rent a Drysuit Package

To successfully hike the Narrows in winter, you absolutely need to rent some gear.
Zion Outfitters or Zion Adventure Company are two locations that offer drysuit packages in Springdale. Wetsuits are not recommended because of the variable water height.
Since the water depth varies from ankle to waist deep, if you are wearing a wetsuit, the areas of your body that are wet but not currently in the water will get cold — very cold! I had initially considered just using a wetsuit and am very glad that I did not!
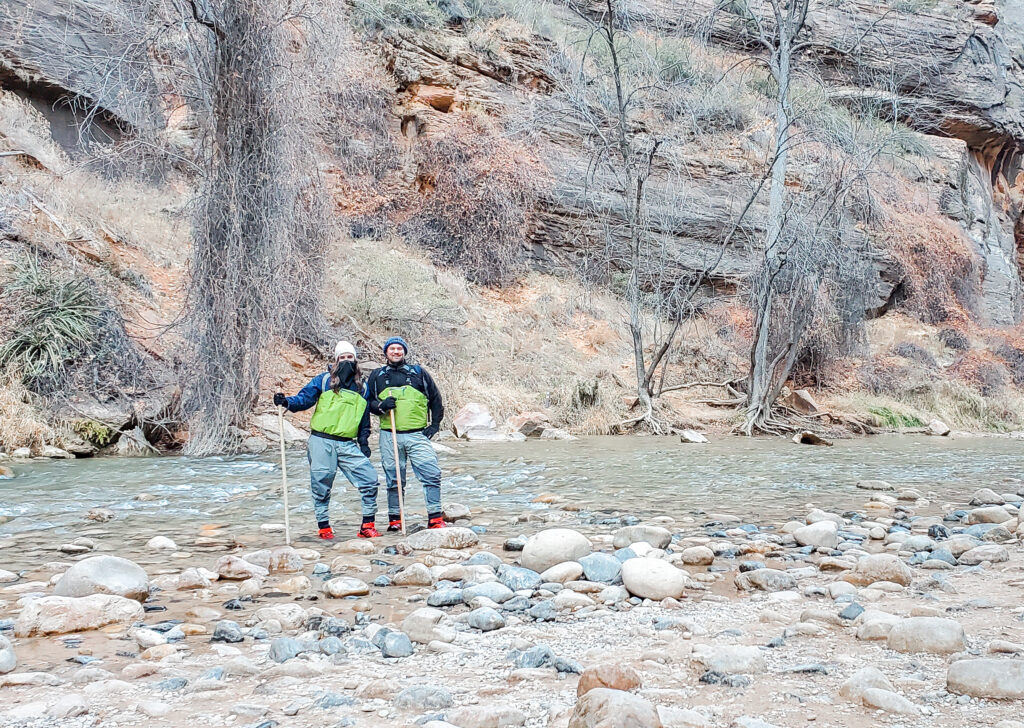
The dry suit packages include the actual drysuit, neoprene socks and boots, and a walking stick.
The drysuits are waterproof, and have a rubber gasket around the ankles that keeps tight to the skin, preventing water from coming up inside the suit. I had no problems with the dry suit, It wasn’t uncomfortable at all for me – although Matthew did note that you can’t let the rubber roll up at all or it can dig in.
The neoprene socks and boots are made from wetsuit material. By design, water enters the boots and socks, but the neoprene material works to use your body heat to warm up the water inside the socks.
Well, that’s the theory anyway, and in practice it mostly worked like that. Sometimes when you stepped, the pressure squeezed out the warm water and fresh cold water would replace it. Overall, our feet stayed comfortable enough, though.
The neoprene boots were actually really great to walk in, as they had a lot of grip and protected our feet well on the rocky riverbed.
The last thing we were given was a really sturdy walking stick. The walking stick was GOLD – so helpful for not losing our balance, and I’d recommend it no matter when you come. Hiking poles are too flimsy to be of much help in the Narrows.

Tip: Go to the outfitters the night before your hike to pick up your gear. That way you are ready to go first thing in the morning!
Zion Outfitters or Zion Adventure Company – Which Outfitter to Choose?
Zion Outfitters offers a few different packages. There’s a dry bib package ($55) and a full dry suit package ($65), which includes a long-sleeve top. There’s also just a dry pants option ($48), but I would definitely recommend doing the bibs or full suit.
Zion Adventures also offers a variety of packages. There’s a dry bib package ($55), a full dry suit package ($75), and a dry pants option ($49).
At both outfitters, all packages also come with the neoprene socks and boots, plus a hiking stick. Honestly, both outfitters are really good and offer similar services, so it’s not a big deal which company you go with.
We ended up going with the bib package and it was good for the water levels and water flow strength that we encountered that day. The water was ankle deep at the lowest and waist high at the highest, though it rarely got higher than mid-thigh. If water levels are higher or the water is flowing strongly, I would definitely go with the full dry suit.
You can make your reservations online ahead of time, and then discuss current water conditions and decide if you need the top or not the day of.
Tip: If you are doing this hike in warmer weather, you can rent a “warm weather package” ($25-27 depending on outfitter) that includes the socks, boots, and pole. If I came back in summer I would definitely consider getting this, because the boots were really supportive + the stick was essential in keeping our balance.
Tip: Grab a map of the Narrows from the outfitter when you’re getting gear. We found it very helpful as we hiked!

What Clothing to Layer Underneath
We debated a long time how much clothing to layer under the dry suit for the Narrows. It was recommended to just layer however you normally would for the weather that day. When we went, the high was about 55 degrees, although it was much cooler in the canyon and we didn’t get a lot of direct sunlight. It was about 25 to 30 degrees Fahrenheit when we started hiking.
I wore thermal underwear and thin joggers on bottom, and a thermal layer, sweatshirt, and windbreaker with a hood on top. Matthew did a base layer and pajama pants on bottom, and a t-shirt, sweater, and jacket on top.
Both of us also had a beanie and good winter gloves (DO NOT forget the gloves!) This combination of clothing was perfect for the weather we had in the Narrows that day.
Getting to the Trailhead
Visiting Zion National Park in winter in general is a great time because crowds are so much lower than normal.
Because of the lower crowds, between the very end of November and March (except for the days between Christmas and New Year, and some weekends – verify the current schedule before you go) there are no shuttles and you can drive straight to the trailhead at the Temple of Sinawava. I loved this!
Just note that the parking lots are not gigantic and can fill up. When we went we started early because we were afraid of running out of parking spots, and there is not an easy overflow parking area.
However, there were still tons of spaces left at the Narrows trailhead when we started at about 8am.
A Step by Step Trail Guide
We started from the Temple of Sinawava at about 8:30am. This is also referred to as the bottom-up hike. The first mile of the Zion Narrows trail is actually the Riverside Walk which ends where you get in the river and start hiking.
The Riverside Walk is paved, flat, and a good option if you just want to get a taste of the canyon and splash in the water for a bit. This section is about a mile long and will take about 20 minutes.
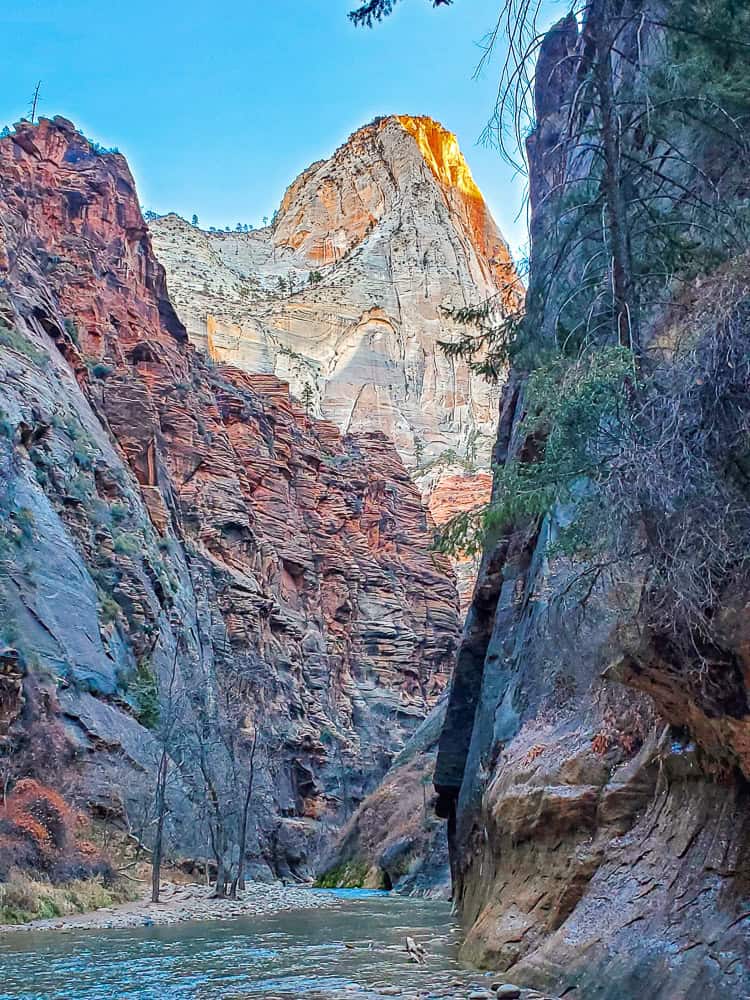
Once you actually get to river entrance point, things get awesome quickly. The canyon has been getting, ahem narrower, throughout the Riverside Walk, but now the canyon shrinks to the width of the river.
As you begin hiking in the water, you’ll notice the ice on the canyon walls. With the water being just a bit above freezing and the air temperature dropping below freezing each night, a lot of the gentle waterfalls or other “weeping” rocks turn into gorgeous ice falls and icicles.
Matthew especially loved the effect created as water flowed behind the ice sheets – it was mesmerizing – and a definite perk to the winter hike. There are several good examples of these in this first section of the trail.

Orderville Junction
After this, expect a nice variety of wall colors, rock formations, different size and style sandbanks, and all around gorgeous views. Walking from the ice falls to the Orderville Junction can take anywhere from 1-2 hours depending on your pace and how often you stop to take pictures.
I highly recommend taking the detour into the junction, but be aware that you are supposed to stop at the falls about a mile in. In the winter, the falls get pretty icy to traverse. (What? No! We definitely didn’t try to get over it. Why would you say that?)
This detour was actually pretty fast; the water level is lower in this branch and the ground relatively flat.

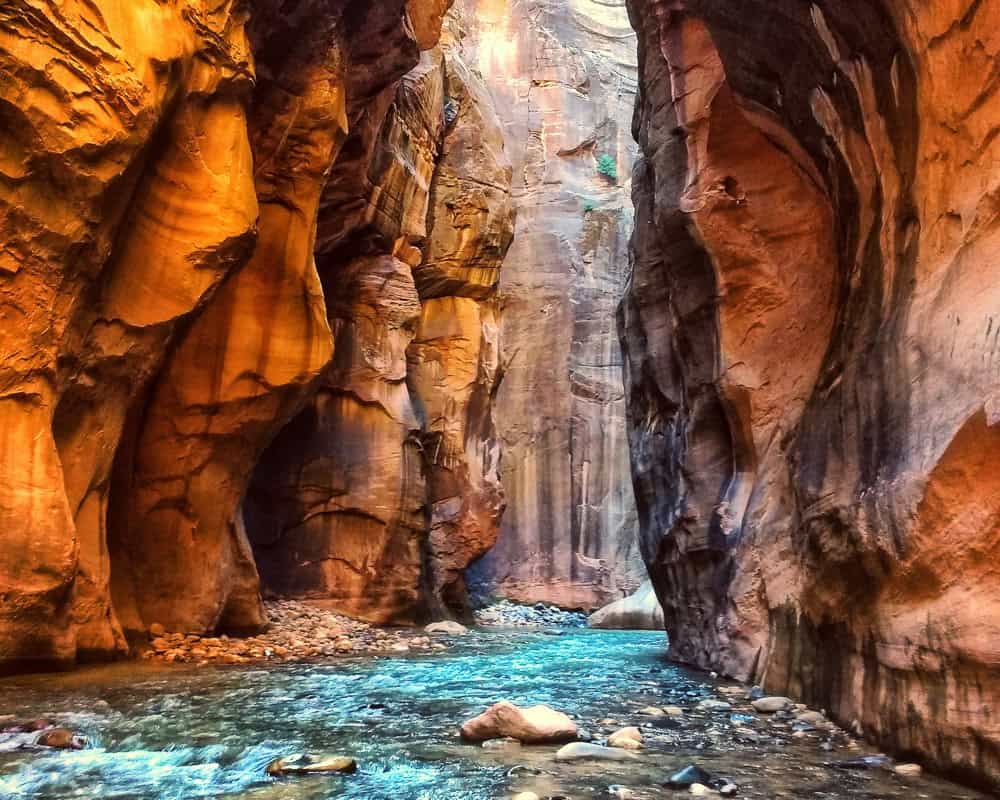
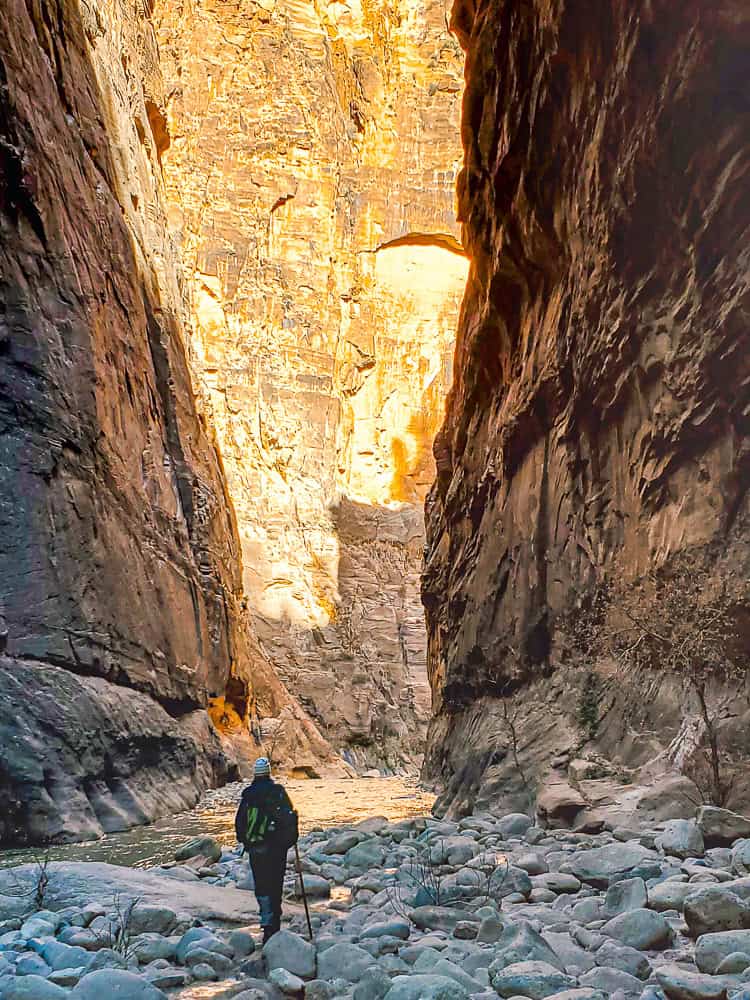
Wall Street
The last section of the Narrows hike we did was Wall Street. If you can get this far it is definitely worth it, as the canyon narrows even more into a slot canyon. You really feel overpowered by those tall canyon walls, in the best way!
You can keep going for up to 2 more hours from here until you reach Big Springs (which is the end of the trail), but there are some very deep sections that you would want a full body suit for in winter.
Was Hiking the Narrows in Winter Cold?
Well, yes, it was winter, of course. But did we get cold? We started at 8:30 a.m. and for the first couple hours, the water felt chilly. The wetsuit boot definitely warmed the water up, but it was still quite cool.
As we noted above, we think this was mainly because sometimes the water would refresh fast enough in the socks that our body heat wouldn’t warm it before more cold water displaced what was being warmed.
To combat this, we switched from hiking in the water all the time – it was fun and we were enjoying the novelty – to hiking in the water only until we reached a sandbar area (rocky, but we’ll call it a sandbar) and then hiked on the sandbar until it ended.
This strategy gave the water a chance to warm and really kept our feet from getting too cold, but still gave us plenty of water hiking time. An added bonus is you travel a lot faster out of the water.
I will also say that after a few hours of hiking and the temperature warming up a bit, we did not have any problems with feet getting cold. If you start the hike a little later in the day, or your temperatures are a little warmer, this might not be an issue at all for you.
Why Winter Is The Best Time to Hike the Narrows
Zion can get crazy crowded during the warmer months. And I just don’t love overly crowded places in nature!
When I was doing research before we went, I found these photos of The Narrows (via the National Park Service.) I mean, I’m sure it’s lovely in summer time, but dang that’s a lot of people.

I don’t think we were ever in the canyon with more than one other group. We were often all by ourselves for long periods of time. All by ourselves! In one of the most famous and gorgeous hikes in the United States! I’ll take it.
Beyond that, the cold wasn’t much of an issue with the right gear. So yes, while hiking the Narrows in winter is chilly, the trade-off is awesome!
Verdict: SO WORTH IT.

Recommended Clothing & Gear:
Base Layer/Thermal Layer for Women: Base layers are so crucial for staying warm in cold temperatures! These ones are thin and comfortable but keep you nice and cozy.
Base Layer/Thermal Layer for Men: Similar to the women’s base layer, this set is thin and comfortable, and fits close to the skin to not add a lot of bulk. And with over 37,000 reviews, this is a well-loved set by many!
Beanie: Don’t just rely on your hood to keep your head warm!
Waterproof Gloves: I love my good, thick waterproof gloves – they make such a difference in keeping my body temperature regulated. (I would not recommend those thin gloves designed to work with smartphones – they just don’t keep you warm at all!)
Waterproof Backpack: While hopefully your backpack will stay completely dry, it’s always a good idea to have a waterproof bag when hiking in a river.
Hydroflask: Keeps your liquids warm or cold, and is perfect for filling with hot cocoa or coffee to sip on your hike.
Power Bank: You are FOR SURE going to want to take lots of pictures on this hike, and this power bank is my favorite for charging up a low battery. Remember – cold can drain batteries faster, so extra power is important!
A few other notes about Narrows clothing:
Cotton – especially on bottom layers – isn’t as good as wool as it retains water more. No clothing is perfectly waterproof and over time some water worked in through the dry-bibs around Matthew’s knees. By the end of the hike, the pajama bottoms soaked up and retained some water. It never got uncomfortable, but it was close. (I had no problem with this)
You don’t want to over-layer on bottom, because with the dry suit it is a lot harder to remove layers.
I would definitely recommend bringing an extra pair of gloves in case yours get wet. It’s not hard to accidentally get your hands wet and you want to keep your hands protected.
If you go with the bib package, you may want to consider bringing an extra top layer that is easy to pack in case you slip and get wet. We saw a group where one person got splashed and then quickly switched out for a dry layer. Staying dry is crucial for being comfortable.
How Long Does the Hiking the Narrows Take?

This map above helps illustrate how long the different distances are on the Narrows. Since most people only do part of the entire trail, its more helpful to look at the estimated hike times to different points of reference.
I would for sure try to make it to Wall Street (more on that below), which the map estimates takes about 2 hours one way.
We ended up hiking to just past Hiccup Spring. We spent about 3 hours hiking up, and another about 40 minutes exploring Orderville Canyon.
The return trip went a lot faster – walking with the current makes a difference, and we didn’t take as many pictures. It took us about 2 hours to get back.